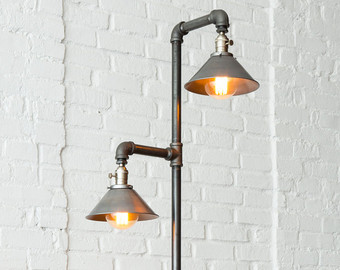
 Do you have leftover industrial piping that you don’t know what to do with? You could “wow” guests at your house by making an industrial pipe floor lamp. An industrial floor lamp could range from $500- $1000 dollars. Why pay hundreds when you can build your own for half that price?
Here’s what you will need:
The Structure Pipes:
1- 36” Long ¾” Black Metal Pipe
2- 12” Long ¾” Black Metal Pipes
4- 8” Long ¾” Black Metal Pipes
3- 6” Long ¾” Black Metal Pipes
2- 5” Long ¾” Black Metal Pipes
1- 2” Long ¾” Black Metal Pipe
6- ¾” Black Metal Pipe Close Connectors
7- ¾” Black Metal Pipe Elbows – 90°
5- ¾” Galvanized Metal Pipe Tees
1- ¾” Galvanized Metal 4-Way Pipe Splitter
3- 1”-to-3/4” Black Metal Reducing Couplers
4- ¾” Galvanized Metal Pipe Floor Flanges
1- ¾” Black Metal Pipe Nut
The Lighting:
1- 15 foot Lamp Power Cord (16 Gauge)
4- Keyless Phenolic Light Sockets
10 Feet of Lamp Wire (16 Gauge)
1- Package Winged Wire Connectors (Min, 2x #18 Gauge – Max, 3x #12 Gauge)
3- Feit Electric Original Vintage 60w Bulbs
1- Can Rustoleum Textured Black Spray Paint
Paper Towels (Lots of them)
Grease-Fighting Household Cleaner of Your Choice (I used Green Apple)
60-Grit Sandpaper
Painters Tape
Electrical Tape
Wire Cutters
A Small Philips Head Screwdriver
We carry a lot of these materials. Contact us today if you need to purchase them.
Instructions for the Industrial Floor Lamp:
First, start by wiping all the pipes with paper towels that are soaked in household cleaner. Also, take your 60-grit sandpaper and sand off any parts that have laser-printed labels on them. If you plan on spray painting the pipes, then you should sand all of the parts to ensure that it will have an even coat. Stuff the openings of each component with paper towels. Then. Seal them off with painters tape. Next, spray paint.
Attach two 8″pipes to opposing sides of your four way splitter. Screw on an elbow piece on the end of those pipes. Next, screw on your two 5″ pipes on the end of the elbow pieces. To form the top two legs of your base attach two of the floor flanges on the end of those pipes.
Take your two bottom legs and attach 2” length of pipe to the end of a pipe tee. Next, screw that on to the bottom of your four way splitter. Then attach the other two 8” pipes, then your two elbows, then two close connectors and the last two flanges. This will make up your entire base. Lastly, use a close connector to attach a pipe tee lengthwise to the top of the four way splitter. You will string your power cord up through the hole here.
If your base is wobbly, adjust the tightness of your flanges until all four “feet” are firmly planted on the ground.
Grab a pipe tee and attach a 6” length of pipe. Next, attach an elbow and screw in a close connector. Lastly, attach a reducing coupler.
Repeat this two more times to make two more arms.
The lights will be wired in parallel to make the bulbs independent. You will be connecting positive wires to positive wires and neutral wires to neutral wires.
Start by cutting your wires. You will need 30” length of lamp wire, 26” length of lamp wire and two 14” lengths of lamp wire.
Next, feed the 30” length wire from the highest lamp arm down through the top 12” pipe so that it terminates at the second lamp arm tee. Next, feed the 14” lengths of lamp wire through the other pipe arms.
From the bottom string your power cord through the side of your power tee, out of the top of the tee and up through the 36” pipe so that it terminates at the first lamp arm tee. Then, string the 26” length of wire from the first lamp arm tee up through the bottom 12” tube to the second lamp arm tee.
Next, take the positive and neutral strands of each wire apart. Don’t forget which strand is which.
Strip off a quarter inch of insulation from each strand with a wire cutter. This should expose a nice bit of bare wire.
At the first lamp tee: Twist the first lamp wire, exposed neutral ends of the power cord, and the 26” connecting wire together. Then, screw on a winged connector as tight as you can possibly get it. Test your wires by lightly tugging on them to ensure that everything is fastened securely.
Repeat this also for the positive ends of the power cord, connecting wire, and first lamp wire.
Stuff this into your first lamp tee. Even though it will be tight, force them in.
Take the bottom of the lamp tee and attach the 36” pipe to it and the 12” pipe to the top of the lamp tee.
Now, back at the second lamp tee. Repeat the coupling process for the neutral strands, the third lamp wire, connecting wire and the second lamp wire. Locate the ribbed strands, twist the bare ends together, and screw on a winged connector as tightly as possible.
Take the positive strands of the third lamp wire, connecting wire, and second lamp wire and repeat the coupling process.
This piece will then be stuffed with the second set of connectors into the second lamp tee. Next, take the bottom 12” tube and attach it to the bottom of the lamp tee and the top of the lamp tee.
Take the third lamp tee and attach it to the top 12” pipe and screw on a nut cap to the top of this tee.
Take the strands of the wire sticking out of each lamp arm and attach it to your light sockets.
Note: Your light sockets will have bronze and silver colored terminals located on the bottom. The neutral strand of wire goes with the silver part and positive wire goes with the bronze.
Turn the silver screw on the socket until it is barely attached on the first lamp arm. The neutral strand goes through the safety arm ring at the bottom of the silver terminal and the light socket.
Use the gap or hole in the socket under the terminal to shove the wire into it and just tighten the screw in order to smash the terminal onto the wire.
There should be as much wire touching the terminal as possible.
Repeat this with the bronze terminal for the positive. Wrap electrical tape around the bottom of the socket. This will keep exposed wire insulated and the connection secure.
Place the socket in the lamp arm and fasten into place with super glue and attach the metal to the socket. Wrap electrical tape on top of the metal coupler and the socket.
You’re done! Time to attach the lamp structure to the base and screw in some light bulbs.
Finally, we carry a lot of these materials. Don’t forget to check our website or give us a call at 1.888.698.7888.

Detroit Nipple Works Inc. carries a variety of pipe, valves, fittings, or tubing including carbon steel pipe nipples. We utilize a variety of high-quality materials to manufacture pipe nipples.
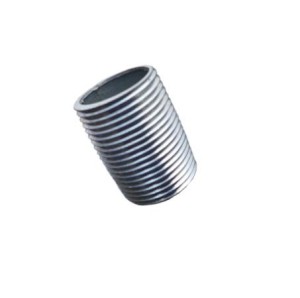
Nipples are fittings consisting of a short piece of pipe usually provided with a pipe thread at the end for connecting other fittings. At Detroit Nipple Works, we manufacture carbon steel pipe nipples according to industry trends or customer needs.
Other nipples that we carry are:
Looking for sizes of carbon steel nipples or our other pipefittings?? Check out our Detroit Nipple Chart.
Not looking for carbon steel pipe nipples? We also provide other pipes or pipe related products. Detroit Nipple Works has been in business for over 80 years and we are confident that our knowledgeable sales staff can help you out.
Contact us here or get a quote!

At Detroit Nipple Works, we specialize in Stainless Steel Weld Fittings as well as the following:
Stainless steel weld fittings are available from Detroit Nipple Works. At Detroit Nipple Works, we carry an extensive line up of pipes and nipples for a variety of industries. In addition, to the automotive industry, we supply materials to the aerospace, construction, and other industries. When it comes to fittings, we carry all types such as:
| Malleable Fitting | Stainless Steel Fittings | Cast Iron Fittings |
| Forged Steel Fittings | Aluminum Fittings | P.V.C. Fittings |
| Galvanized Fittings | Brass Fittings | Weld Fittings |
Our fittings range from materials such as iron, stainless steel, brass and more. Also, we carry galvanized pipe fittings with more than 500 to choose from. Our sizes range from 1/8 inch all the way to 6 inches. Our fittings are available for Couplers, Hex Bushings, Bell Reducers, Reducing Tees, Tees, Crosses, 90° Ells, 45° Ells, Street Ells, Plug, Caps, Unions, and Nipples.
With the stainless welds have a high resistance to corrosion. This helps it to withstand extreme cold or heat. These welds are used in industrial applications throughout the country. Since 1897, Detroit Nipple Works has provided quality nipples, pipes, and fittings for industries throughout the country. Give us a call today at 313-872-6370 today for questions or place your order.